Deploying Lambda Functions with SAM CLI

Serverless applications are a relatively new paradigm in software development. Serverless architectures allow developers to create, access and deploy applications without managing servers or infrastructure.


What is the AWS Serverless Application Model (SAM)?

AWS SAM is an open-source framework for building serverless applications. It provides shorthand syntax to express functions, APIs, databases, and event source mappings. You can define the application you want and model it using YAML with just a few lines per resource.

In this blog post, you will explore the Serverless Application Model framework, SAM template anatomy, and SAM CLI.

We’ll take a look at how you can create a new SAM app, and manually deploy it to AWS Cloud.

Prerequisites

  • AWS SAM CLI is a command-line tool that operates on an AWS SAM template and application code. To install SAM CLI please follow the AWS official documentation.
  • S3 Bucket to upload the packaged application artifact for deployment.

Code Repository

GitHub URL for the SAM application – https://github.com/avasisht/sam-app

Creating SAM application

To deploy the AWS SAM application using SAM CLI, you need

  • SAM template file, SAM template closely follows the AWS CloudFormation template file format, the primary difference between the two is Transformation declaration.
				
					AWSTemplateFormatVersion: '2010-09-09'
Transform: 'AWS::Serverless-2016-10-31'
Description: An Amazon Connect Lambda function.
Parameters: 
  Origin:
    Description: Approved Origin for amazon connect instance
    Type: String
    Default: https://www.example.com
  Identity:
    Description: Amazon Connect Instance Identity Provider 
    Type: String
    AllowedValues:
      - CONNECT_MANAGED
      - SAML
    Default: CONNECT_MANAGED
  InstanceName:
    Description: Amazon connect Instance Name
    Type: String
    Default: connect-instance-name
Resources:
  ConnectFunction:
    Type: 'AWS::Serverless::Function'
    Properties:
      Handler: lambda.lambda_handler
      Runtime: python3.9
      CodeUri: srcin/
      Description: An Amazon Connect Lambda function.
      MemorySize: 128
      Timeout: 300
      Environment:
        Variables: 
          ConnectInstanceName: !Ref InstanceName
          Identity: !Ref Identity
          Origin: !Ref Origin
      Policies:
        - Statement:
          - Sid: IAMPutRolePolicy
            Effect: Allow
            Action:
            - iam:PutRolePolicy
            Resource: '*'
        - AmazonS3FullAccess
        - AmazonConnect_FullAccess
				
			
  • Source code, of your lambda function. In this example, you are deploying a Python Lambda function to create an Amazon Connect Instance.

You can deploy any function of your choice, make sure you adjust the template file accordingly. For example, environment variables, IAM roles, policies, etc.

				
					import uuid
import json
import time
import sys
import os
import json
import boto3

def lambda_handler(event, context):
    #generate a uuid
    print(boto3.__version__)
    uuId = str(uuid.uuid4())
    uuidSplit = uuId.split("-")[4]
    bucketName = os.environ['ConnectInstanceName'] + uuidSplit
    instanceAlias = os.environ['ConnectInstanceName']
    conClient = boto3.client('connect') #we will need to specify region on this
    
    #create a connect instance
    conResponse = conClient.create_instance(
        ClientToken=uuId,
        IdentityManagementType=os.environ['Identity'],
        InstanceAlias=instanceAlias, #generates a random instance alias
        InboundCallsEnabled=True,
        OutboundCallsEnabled=True
        )

    #get the arn and ID, we will need those later
    arn = conResponse['Arn']
    connectId = conResponse['Id']

    #Wait maybe? This would be better accomplished with a Step Function
    time.sleep(90)

    # Create S3 Bucket
    s3Client = boto3.client('s3')
    s3response = s3Client.create_bucket(
        ACL='private',
        Bucket=bucketName,
        CreateBucketConfiguration={
            'LocationConstraint': 'ap-southeast-2'
    },
    ObjectLockEnabledForBucket=False
    )

    # get the ARN of AWS issued KMS Key for Connect
    kmsClient = boto3.client('kms')
    kmsResponse = kmsClient.describe_key(
        KeyId='alias/aws/connect'
        )

    print(kmsResponse)
    kmsKeyId = kmsResponse['KeyMetadata']['Arn']
    time.sleep(15)
    
    # Associate Storage, these must be done one at a time
    conStorageResponse = conClient.associate_instance_storage_config(
        InstanceId=connectId,
        ResourceType='CHAT_TRANSCRIPTS',
        StorageConfig={
            'StorageType': 'S3',
            'S3Config': {
                'BucketName': bucketName,
                'BucketPrefix': 'ChatTranscripts',
                'EncryptionConfig': {
                    'EncryptionType': 'KMS',
                    'KeyId': kmsKeyId
                },
            }, 
        }
    )
    conStorageResponse = conClient.associate_instance_storage_config(
        InstanceId=connectId,
        ResourceType='CALL_RECORDINGS',
        StorageConfig={
            'StorageType': 'S3',
            'S3Config': {
                'BucketName': bucketName,
                'BucketPrefix': 'CallRecordings',
                'EncryptionConfig': {
                    'EncryptionType': 'KMS',
                    'KeyId': kmsKeyId
                },
            },
        }
    )
    conStorageResponse = conClient.associate_instance_storage_config(
        InstanceId=connectId,
        ResourceType='SCHEDULED_REPORTS',
        StorageConfig={
            'AssociationId': 'string',
            'StorageType': 'S3',
            'S3Config': {
                'BucketName': bucketName,
                'BucketPrefix': 'Reports',
                'EncryptionConfig': {
                    'EncryptionType': 'KMS',
                    'KeyId': kmsKeyId
                },
            },
        }
    )
    conAddOrigin = conClient.associate_approved_origin(
        InstanceId=connectId,
        Origin= os.environ['Origin']
    )
    #we're done
    return {
        'connectArn': arn,
        'bucketName': bucketName,
        'instanceAlias': instanceAlias,
        'status': 200
    }


Now you have SAM files ready, let’s package and deploy the solution to AWS cloud using SAM CLI.

SAM Package and Deploy

To Package the AWS SAM application, run the sam package command. This command creates an output file, a .zip file of your code and dependencies, and uploads the file to Amazon Simple Storage Service (Amazon S3)

				
					sam  package --s3-bucket "s3-bucket-name" --template-file "template-file" -name --output-template-file "output-file-name" --profile aws-profile


Our SAM application directory structure looks something like. 

				
					abhishek@5CG933155Y:$ tree
.
├── srcin
│   └── lambda.py
├── srcout
│   └── template-generated.yml
└── template.yaml


To Deploy the packaged AWS SAM application, run the sam deploy command.

				
					sam deploy --template-file "srcout/template-generated.yml" --stack-name "cf-stack-name" --parameter-overrides "Key1=Value1 Key2=Value2" --capabilities CAPABILITY_IAM --profile aws-profile


In the deploy command, you have to refer to the output file “template-generated.yml” generated in the previous step.

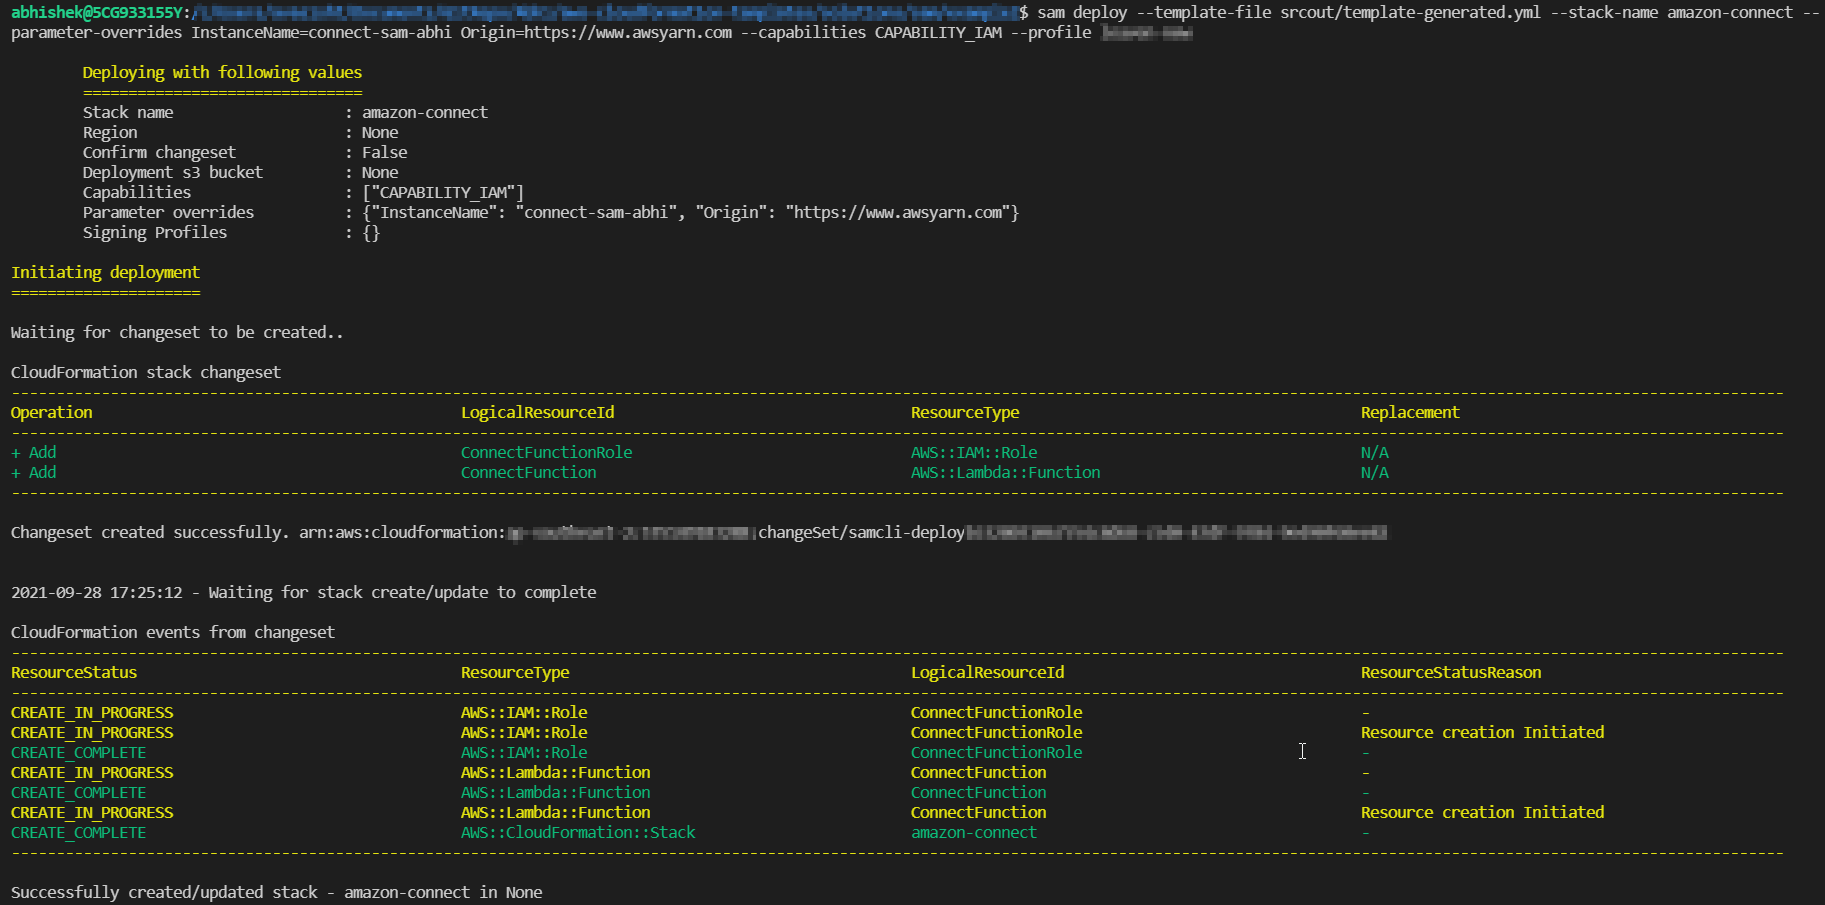
Woo-Hoo, you have successfully deployed a Lambda function using AWS SAM CLI. 

Validation

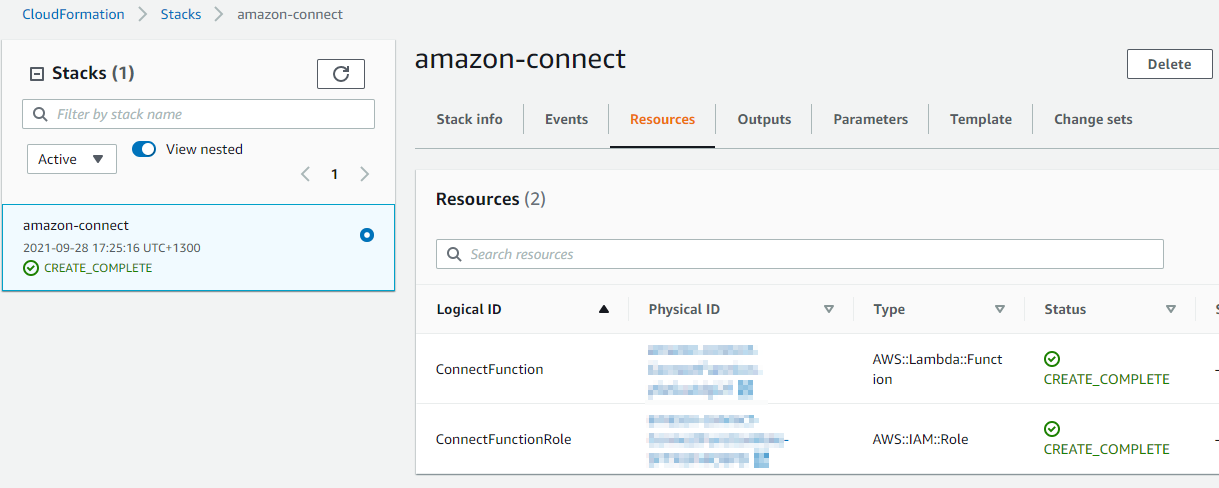
Log in to the management console and navigate to the CloudFormation Service and confirm the stack has been created successfully. 

Clean Up

To clean up the resources created using SAM CLI, execute the sam delete command.

				
					sam delete --stack-name "stack-name" --profile "aws-profile"


Conclusion

The AWS SAM framework is a new way to manage the serverless application life cycle. With SAM CLI, developers can quickly build, package, and deploy serverless applications, which includes services like lambda functions, API gateways, DynamoDb tables, Cloudwatch event rules, etc.. in a few steps. Using this model has many benefits, such as a single deployment configuration not requiring additional resources or skillset knowledge. It also has built-in best practices, saving time setting up IAM roles, policies, enforcing code reviews, and more. It helps developers focus on what they do best – developing solutions! with little code.

Abhishek Vasisht

Abhishek Vasisht

(Visited 351 times, 1 visits today)